
Today I’going to bring you through the basics of creating stereoscopic visuals. If you don’t have a set of anaglyphic 3D glass laying around you can make them fairly easily with plastic glasses frames from a movie theater and some red and blue lighting gel. Here is a picture of the glasses I made.
 It’s important that you get lighting gel with a low transmission factor for the other color. you want the least amount of blue light passing through the red filter and the least amount of red light passing through the blue filter.
Stereoscopy works by tricking your brain into perceiving depth, at the end of the day it is just an optical illusion. The illusion happens when you show the eyes two separate images that the brain can converge into one.
Let’s start by building a simple render network with a twist… we will have two cameras and two render TOPs. Set the “left eye camera” to the left render TOP and the “right eye camera” to the right render TOP. Below you will see an example with labels.
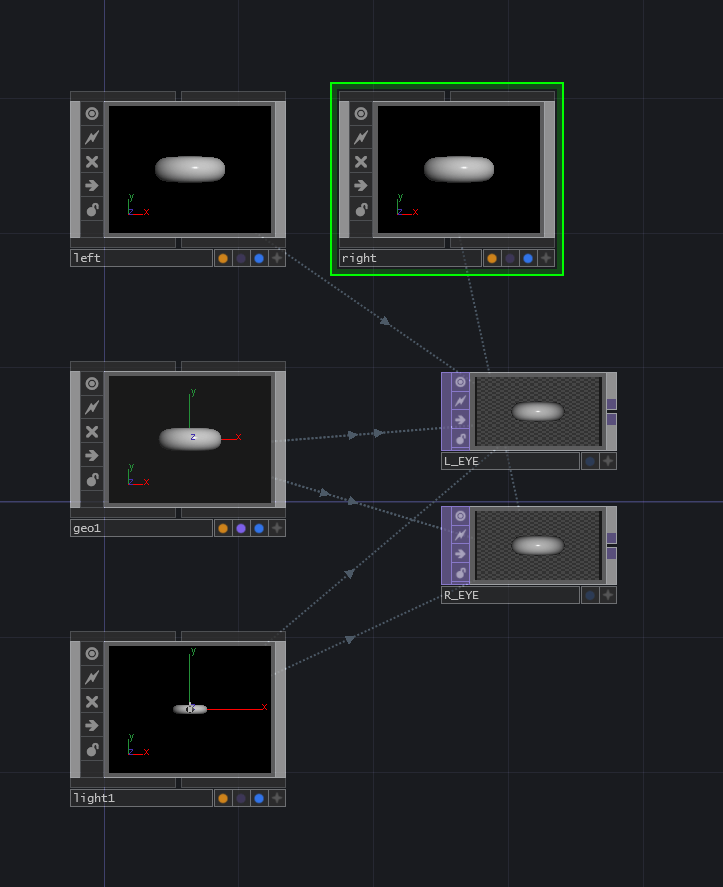
The two cameras will capture two different views of the same object. The trick is to make the eye separation or “inter-ocular distance” small enough so that the brain can still converge the images.
Create a Object null called parent and make it the parent of the two cameras. Select both cameras and set their translate position to 0,0,0. Then translate the Object null parent 5 units in the z direction. This should move the cameras back with it.

Once you have done that translate the designated left camera to -0.05 units in X direction and the right camera to be +0.05 units in the X direction. This will provide a small amount of separation to create the effect.
Drop down one more Object null and name it “lookAT”. Set this null as the lookat point for both cameras and translate it -10 units in the z direction.
You now have a very basic stereoscopic rig. If you have some other means of doing stereoscopy this is as far as this tutorial might be helpful. The rest of the blog will be focused on making anaglyphic rendering.
Now lets make it so we can use our homemade anaglyphic glasses. After each of the render TOPs place a channelmix TOP. Take a look at the 3D glasses you have or made and take note of which eye is red and blue. For me the left eye is red so I want to make sure that I remove all blue from the left eye render, and visa versa for right. In the channelmix TOP parameters I am going only allow red pixels to be shown. Do the same for the other eye and color.


Now take those two TOPs and composite them together. Change the operation to “add”. Right-click and view the composite TOP and put your glasses on. You should see your torus with a bit of depth to it. This becomes even more apparent if you rotate the Geo by putting the expression “absTime.frame” in the rotate x parameter.

Play around with the settings like the “inter-ocular distance” and the position of the lookAT null to get the setting just right. Then have fun creating sweet stereoscopic visuals.